Webinar Transcript
Gavin Roberts speaking: Welcome everyone to the webinar. This is Gavin Roberts, Business Account Manager. I am signing in from India, to welcome you all to our webinar today. It owns the topic ‘How to Prepare Cost-Effective Patent Drawings – Accepted Across Countries’.
I will go on to introduce this topic and the esteemed speakers in our session today. However, before that I welcome all the participants from different countries. Your participation is a wonderful encouragement to the efforts and the attempts that we’re making to raise awareness and spread knowledge. PatSketch owns this over several years of working with inventors, R&D organizations, IP departments, and IP law practices.
Our first speaker of the session today is Punit Mehta. He is the patent Illustrator with PatSketch. He has the experience of more than two years of working with patent industries. Moreover, he gained IP expertise in utility, design, office action, replacement sheet, and other patent illustration jobs. Welcome to the webinar, Punit.
Our second speaker for the session today is Ankur Sharma. He is the Senior Patent Illustrator at PatSketch. He owns experience of more than three years in the patent industries with utility, design, office action, plants, and replacement sheet patent illustration. Welcome to the webinar, Ankur.
We will start the presentation today. Let me ask our speakers for the initial remarks on today’s webinar topic, ‘How to Prepare Cost-Effective Patent Drawings – Accepted in Multiple Countries’.
Also Read: How to Correct Patent Drawings Rejected Due to Unclear Broken-Line Disclosures
Context of the Webinar
Punit Mehta speaking: Thank you, Gavin. This webinar covers the essential points on the importance of the cost-effective patent drawings. Further, it discusses how we can make cost-effective patent drawings that can get accepted in multiple countries. Moreover, it discusses the satisfactory reproduction of drawings and will take you ahead with how can we prepare the drawings from 3-D files that are rejection free. Also, this webinar covers the other techniques for preparing cost-effective patent drawings as well.
Gavin Roberts speaking: Thank you, Punit. Let us now ask Ankur to share his initial remarks.
Ankur Sharma speaking: Thank you, Gavin and Punit. This section sheds some light on the important points of comparison among some of the leading patent offices. Further, it discusses their similarities and some of the dissimilarities. Moreover, it will make you aware of the different kinds of shadings that we use for the design patents to save them from rejection. Thus, the discussion will revolve around the techniques and methods to create cost-effective patent drawings. Further, it revolves around making sure that your patent is rejection proof by multiple countries.
Also Read: Secrets to Avoid EPO Rejections in Patent Drawings
Latest Offers by PatSketch!
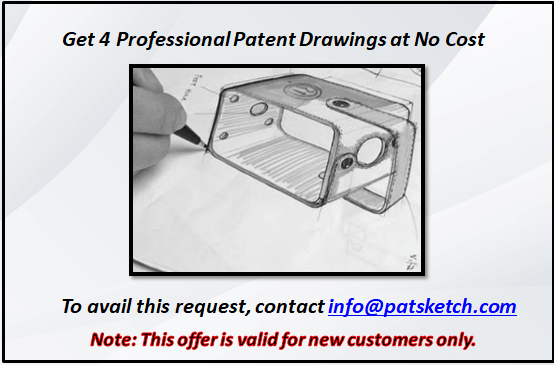
The PatSketch team is offering up to 4 drawings at no cost to the attendees. The offer is valid for a single request only. The participant of our webinar can drop us an e-mail, later on, info@patsketch.com.
Agenda of the Webinar
Punit Mehta speaking: This section covers the agenda and the key points that the webinar covers.
- Satisfactory reproduction of cost-effective patent drawings. This section discusses the guidelines, tools, and points that one must consider while preparing the drawings.
- Preparation of rejection proof cost-effective patent drawings from 3-D files. We will discuss how a professional illustrator can use 3-D software for a better understanding of both inputs.
- Techniques to prepare drawings: here we will cover some techniques and software to prepare drawings that are cost-effective and are rejection free.
- Comparison between guidelines of different jurisdictions. This topic discusses the guidelines of different jurisdictions. Further, it discusses how we can prepare drawings that get approved in multiple countries.
- Types of shading that can be used in design patents. This section will put some light on the importance of shading. Further, it discusses different types of shadings we can use in design patents to ensure their approval from the patent office.
Also Read: Invention Drawings: Why Do You Need Them?
Satisfactory Reproduction of Cost-Effective Patent Drawings
A satisfactory reproduction ensures that you can easily file a patent as per PCT norms. Thus, the companies must follow all rules and regulations. The points that should be considered while preparing satisfactory productions are:
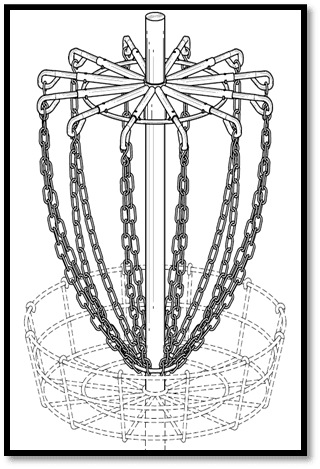
Line thickness
We can use a different type of line thickness for different parts. For example, as shown, we can use
- Solid for outer lines and thicker lines;
- Hidden lines for unclaimed parts in design dockets;
- Reference lines for showing the pointing of the reference number; and
- Shading lines for contour lines.
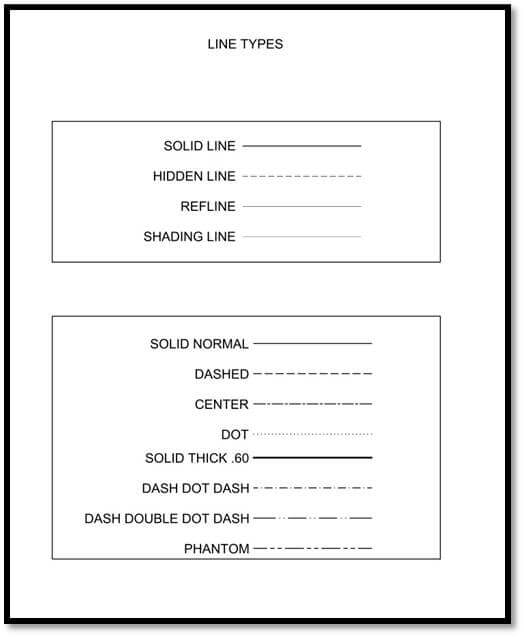
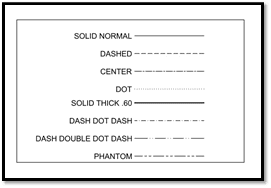
Further to differentiate between different curves or lines in utility drafts, we can use different types of lines. For example, Solid, Dashed, Center, Dot, solid thick, and many more. This will give a proper view of each curve, or line in a draft. Further, it doesn’t create any type of illusion of the same line type to a different color. We create an index to show what each line type should indicate.
Sheet size
Basically, we can use two different types of sheet size to create drawings as per different PTOs. This includes an A-4 sheet and a letter-size sheet. As PCT demands an A-4 sheet, it can be used universally and is acceptable in multiple countries. The margin we use for A-4 sheets is
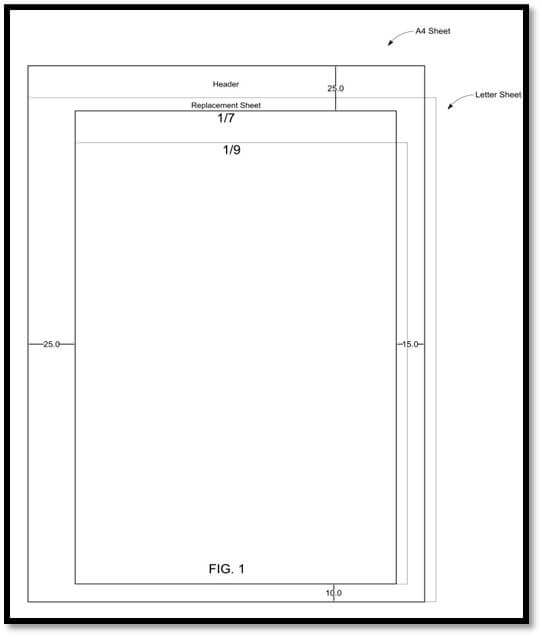
- Top margin of 2.5 cm
- Left margin of 2.5 cm
- Right margin of 1.5 cm
- Bottom margin of 1 cm
As some judiciaries accept letter-size format, we have to prepare the drawings, as per their requirements. The margin for letter-size is also the same as the A-4 size. The only difference between them is the area of the sheet size.
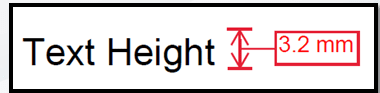
Text size
As per PCT, the text size for patent drawings should not be less than 0.32 cm, which is acceptable in all judiciaries. We can reduce the size of the text to 0.28 cm, but only for some exceptional cases when the client demands the whole drawing. As shown, the sheet holds 3.2 mm of text size.
Further, you can also view another sheet. While preparing drawings, you have to create all drawings on a single sheet. So if there are lots of texts, we can decrease the text size to 0.28 cm. Moreover, the text size of the figure number and page number should be different from the simple text reference number. This maintains a difference between them.
Also Read: Concept Sketch to Patent Drawings
Requirements of the Drawings
There are some PTO requirements which you must follow in the drawings or sheets to receive patent grants.
There is overcrowding of sheets. As per PTO, one sheet can contain multiple drawings, but you must not overcrowd it as it may create illusion or margin issues.
According to PTO, the sheet should be crease-free and shall not be folded.
Further, one sheet should contain only one figure. The drawings should be in durable black and white color. You can arrange the different figures on a single sheet or multiple sheets without wasting space.
Case Study on Satisfactory Reproduction
This is a case study of satisfactory reproduction. For better clarification of the topic, you must create rejection free drawings. This case study explores the issues faced while filing a patent in different patent associations such as USPTO, PCT, China, India, and many more. Further, it discovers solutions to resolve them. As such, inventors have to submit office action in a given timeframe. The common office action an inventor faces while filing a patent is as follows.
Causes of Rejection
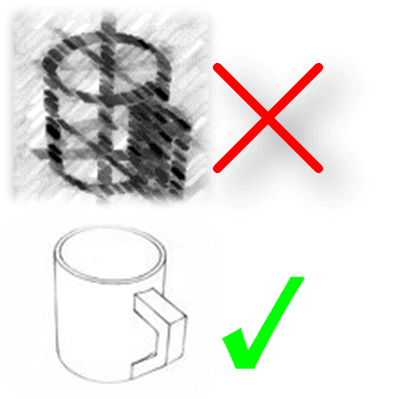
When drawings are too blurry and the difference between the lines is not clear, an office action occurs.
Hence, you must maintain a difference between solid lines, thin lines, hidden lines, references, etc., concerning the judiciary you submit the drawings to. Similarly, there should be a difference between shading lines, solid lines in design patents.
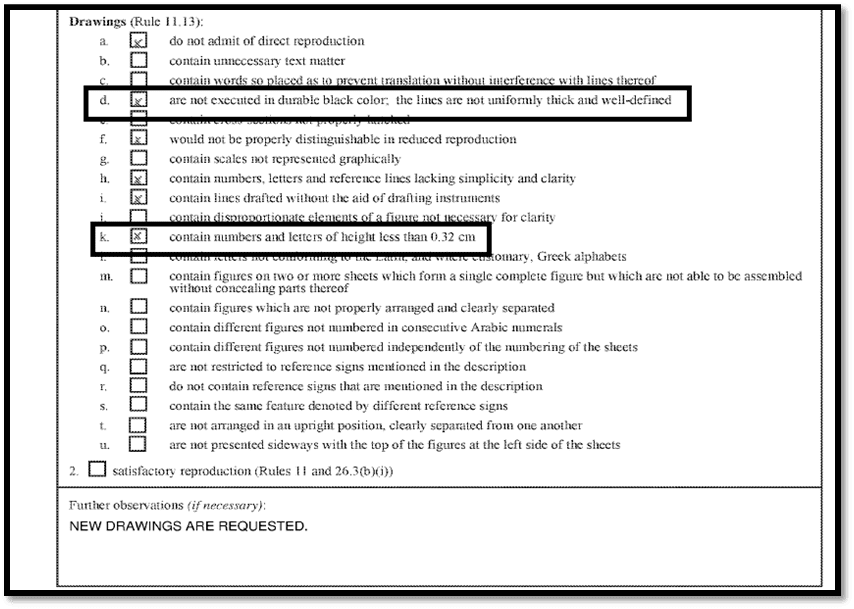
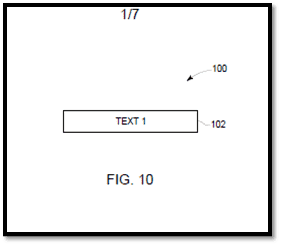
Text size: an office action occurs when the text size is less than the required size according to the guidelines. There is a difference between the size of the reference number and text size. Seldom, the text touches the box and is pulled out of the box in the block diagram. For example, as shown, the text size is smaller than 0.32 cm that is not acceptable in PTOs.
Related Article: WIPO Patent Drawing Rules for PCT Applications
How to Overcome these Office Actions
Blurry lines: you can overcome this issue by maintaining proper and visible differences between different line types to avoid any confusion between lines. We can use different line types as shown in the example including solid-dash-center-dot, etc., to create drawings in design pockets.
Text size: an office action issue can be resolved if your text size is not less than 0.32 cm, according to the PTO guidelines. The reference number and the text size should be of the same size of 0.32 cm.Also, as shown in the example, there should be a visible gap between the text and the boundaries.
Hence, by returning the requirement for the patent office for lines and text size,we conclude that these issues usually occur when there is no difference or a little bit of difference between different types of lines using the drawings or whenthe text size is less than 0.32 cm.This leads to extra costs to file office action and to reproduce drawing from different patent firms. Thus, there are certain implementations and recommendations that we can apply to overcome these issues.
Also Read: Major USPTO Design Drawing Requirements
Implementations and Recommendations
For blurry lines: the thickness of different lines should be clear and distinguishable. We can use different line types and further in-depth we can show what each line-type would indicate.
For text size: You must write the text in a particular type of font, for example, Arial, Times Roman, or Corral. The lettering style having capital letters should be at least 0.32 cm high, but not smaller than 0.28 cm.
- For implementations, you must prepare the template where we can pre-assign the thickness of each line for usage in every drawing.
- The text size of 3.2 MM for every drawing needs to be maintained. We can split the drawings if there is a lot of text.
- You can split the drawings into sheets or in multiple sheets.
- You can decrease the text size to 0.28 cm only when it is an office action. Further, you can do this when you have to fit a large image in a single sheet. Alternatively, you can do this when requested by the inventor to decrease the number of sheets.
- You must not change the size of the reference numbers from 0.32 cm.
- Moreover, if there is an office action, then we have to add the replacement sheets in the head of the drawings.
Also Read: Patent Illustrations: Key Tips to Remember
Preparation of Rejection-Proof Cost-Effective Patent Drawings From 3-D Files
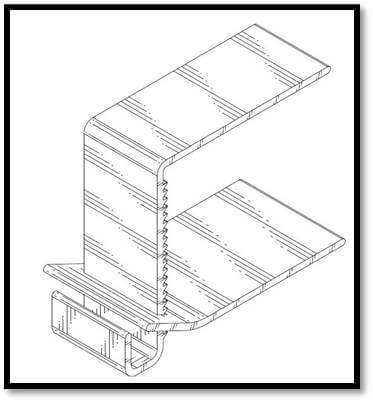
Here’s an example of a 3-D file that we further create into line drawings for filing the patent. 3-D files are cost-effective. They contain every detail even in the case of complicated innovations. Thus, we can prepare the drawings from 3-D and easily apply for a patent without any second thought of office action or rejection. Further, this reduces our cost.
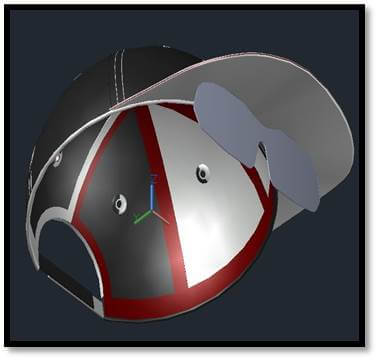
Moreover, we can create cost-effective patent drawings from hand-drawn sketches, photographs, 3-D files, and X-ray images. Sometimes,you may find the drawings too complicated and they may also contain a large number of details. Hence, it is difficult to capture them easily especially, when the drawings are vague and it is the mechanical part. This is because each mechanical drawing contains a lot of necessary details and we have to capture all of them.
To capture all the details, you require a lot of imagination, and it consumes time to capture. In that case, if we have a 3-D file from the client, we can create a drawing with proper details covered within the period.
Points to Remember While Preparing Patent Drawings Using 3-D Files
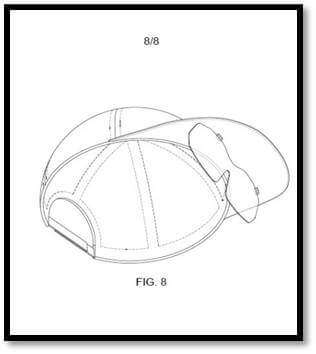
In design patent drawings, it is essential that every view that is top, bottom, left, right, front, back, and perspective view must remain in the same position as each other. They all should contain every part according to the requirements and their projections. This usually takes more time in creating the views from multiple images or sometimes even from a single image.
However, in the case of 3-D files, we can take drawings in lesser time, by taking the reference from the 3-D files and covering all the essential parts. We cannot directly import the 3-D files in AutoCAD for preparing cost-effective patent drawings. This is because, during this, some contour lines or tangent lines will appear, which should be converted into shading lines.
Further, this depends on different jurisdictions. Thus, only a professional knows the judiciary in which it is acceptable and in which it’s not. By keeping in mind all their rules and regulation, the professionals can create acceptable and cost-effective patent drawings.
Related Article: How Patent Illustrators Help in Saving Time, Money and Effort
Techniques to Prepare Cost-effective Patent Drawings
There are numerous software where we can prepare cost-effective patent drawings.
AutoCAD
The software in which we can draw patent drawings in 2-D is AutoCAD. It is the most common software that you can use to create cost-effective patent drawings as it is easy to use. It allows us to control the pointing of every line to provide quality drawings. Further, it allows us to create line drawings, as well as shaded drawings. Moreover, the file format of AutoCAD is DWG. Further, we can convert that into PDF while filing the patent. Alternatively, we can convert it into another format as required by the client. We can import 3-D files in AutoCAD for rejection-proof drawings as it is cost-effective.
Visio
Visio helps to create drawings that are editable, and one requires them in ESDS format. We can use this software when our clients need the file in Visio format. For creating block diagrams in Visio, it is easy to use connectors as compared to AutoCAD. Moreover, Visio helps us to create many heavy sheets with one click. There are several shapes (25), and we can create a PDF of all the shapes by clicking on the option. Moreover, this software has the most interesting and time-saving feature. If we create a page according to the background and we want to create a lot of pages, we can insert a part or text in the background. The same part or text will automatically appear on every page at the same position. We can also create an A-4 size sheet and letter size in Visio.
Adobe Illustrator
We can create a readable AI format file using Adobe Illustrator. This can happen if the clients need an output file in AI format. Adobe helps us to add or remove or edit a part of the text in PDF. Moreover, it becomes very useful if we own a good quality PDF. Also, it helps us if we wish to change something in PDF. Further, AI helps to create cost-effective rejection-proof drawings with less effort and less time. This helps us to convert in PDF itself and we don’t have to make new drawings.
Corel Draw
Similar to Adobe Illustrator, Corel Draw also helps us to change the good quality PDF – to add or remove anything in it. Thus, you can used it to create better drawings. Corel Draw is helpful when we have to create cost-effective patent drawings. Software on which we can draw 3-D files for reference.Sometimes the client does not provide any source inputs, or the inputs are blurry.In that case, there are two possibilities.
- We can either create hand-drawn sketches;
- Or, we can create conceptual drawings with the help of drawing & editing tools including SOLIDWORKS and CREO. This helps us to further modify the drawings as per the patent information.
We will get the conceptual drawings in the software. Further, we have to create patent drawings in AutoCAD by taking the reference of these files. This will help us to cover every part of the invention and follow the client description. We cannot directly put these conceptual drawings in AutoCAD because these are for reference only. Moreover, we cannot directly file the drawings for a patent, and we have to make these drawings in AutoCAD.
A professional illustrator knows the best software one can use according to the source input to create formal drawings, formal sketches, or photographs. Thus, the most preferable software to create cost-effective patent drawings is AutoCAD because we can control the vortex of lines easily in this software.
Thus, converting 3-D files provided by the client – that can be used in AutoCAD and Illustrator can help in drawing rejection free drawings by following all the rules and regulations that are acceptable in multiple jurisdictions.
Comparison between the Guidelines of Different Jurisdictions
Ankur Sharma speaking: This section will take you a bit closer to the process of ensuring that your drawings are suitable enough to avoid any rejection with different offices like USPTO, EPO, India, China, etc. The previous section gave a brief picture of what these guidelines are. This section will take you to the level of comparison on different parameters of guidelines for different jurisdictions.
Every patent office has very specific requirements for patent drawings. You can adapt a patent application from one jurisdiction for submission to other jurisdictions. However, you must take special care to make sure that the drawings comply with all the rules of the relevant Patent Office. Failure in compliance with all of the patent drawing regulations may result in your application getting delayed or denied. So, let us take a close look over this comparison among the Patent Offices based on different guidelines.
Sheet Size
This rule is almost similar worldwide. EPO, PCT, WIPO accepts the A-4 size of the sheet.Only USPTO allows both A-4 and letter size sheets.

Ink and Lines
The quality of lines also play a valuable role in saving your drawings from office actions. The illustrator will be well aware of these guidelines who can keep track of it. There should be durable, black sufficiently dense, and dark uniformly thick and well-defined lines and strokes. While for USPTO, it should be India ink, or equivalent, solid black lines.
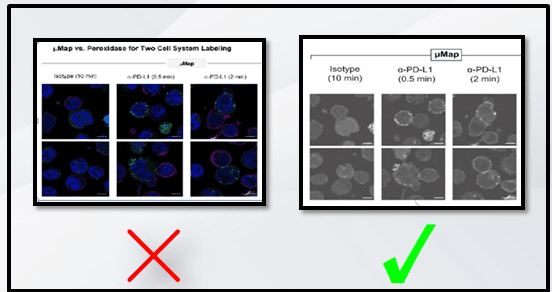
Photographs vs. grayscale vs. color drawings
Not all the patent offices permit to use of photographs instead of black and white line drawings.However, there are some jurisdictions along with USPTO like WIPO India. This is where you can use photographs on rare occasions only. You can only use photographs if it is the only practical medium to disclose the invention.
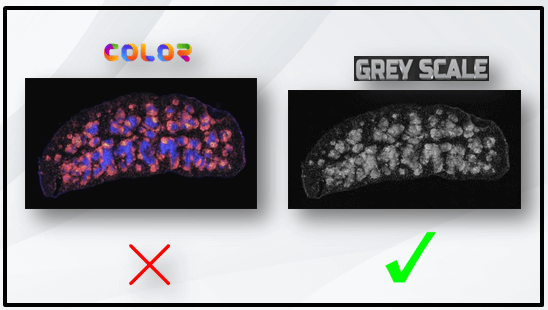
For example, cell diagrams, plants, Vivo images, or micro-organisms. You cannot achieve these via line drawings. However, the black and white line drawings are the most preferable and accepted by almost every PTO office.
Text
A formal drawing contains several contexts. This includes numbers, letters, reference characters, etc. The guidelines for these characters are universal.
- The context should be uniform in style and size.
- They must remain oriented in the same direction as the view, and should not cross, overlap, and intersect with any object to maintain sanity.
The important aspect which leads to an office action is the size or the height of the font which must remain at least 0.32 cm, and context less than 0.32 cm in size, it is not permitted. This rule is the same for multiple patent offices like USPTO, EPO, and many others too.
Shadings
It also plays a great role in receiving approval for your design patent drawings. It frequently utilizes dash lines and dot-dash lines. This helps in illustrating designs and defining bounds, shapes, and surfaces in the design drawing. Moreover, in almost all countries, shadings are available and acceptable tool to define surfaces.
However, keeping this consideration, one of our clients filed the design patent drawings with proper shading to China Patent Office. This ended up getting an office action against it.
The twist here is that because most of the patent offices’ accept the addition of shading, except a few. These include the Chinese patent office. Shading always is not an available tool in some countries. Like in China, you cannot submit patent drawings. However, patent drawings require contour lines. Thus, you must always consult a patent drawing expert. This helps to ensure that all the norms and guidelines of different filing states have been followed or not.
Provisional vs. Non-Provisional Application
An inventor can file a provisional patent application that will never issue a patent for your invention. It only lasts for one year and allows the inventor to conduct more research. Alternatively, it can finish the invention before filing a non-provisional patent application. Moreover, a provisional patent application is simple, informal, quick to file. However, the non-provisional application is the opposite and it is long, complicated, and difficult to file. It contains many parts, and the parts have many rules.
Once, a client had filed a provisional patent application for the invention indirect picture form. That was acceptable for a provisional application. However, he decided to file the final files for the non-provisional application. Further, he received a rejection as both of the application had a slight difference among the drawings.
Also, you cannot use pictures directly, except in certain cases as mentioned earlier. Thus, partial knowledge of the patent application is always going to affect your time, effort, and capital. That is where a professional Illustrator can prevent you from this unwanted cost and effort.
Electronic Submissions
This concerns the submission of sheets for examination. It is different for different nations. For USPTO, you can submit the sheets electronically in PDF and you must not scan hand-made drawings into PDF. However, for EPO there is an online form. 95% of the patent applications at EPO are submitted electronically. Similar to many other patent offices, EPO also accepts drawings and other materials in PDF format.
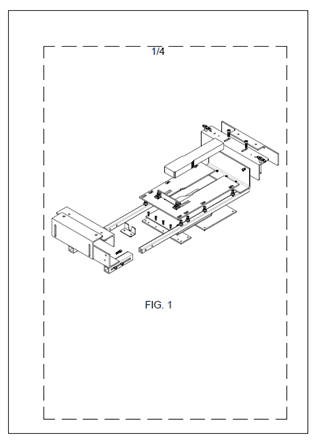
Numbering
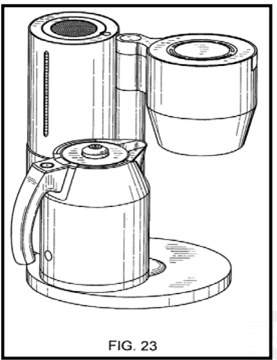
This point is among the most simple, yet, it is the most seen reason for office actions. Most of the PTOs have this rule common among them. Further, you must number the sheets with consecutive, Arabic numerals placed in the middle of the top of the sheet. You can also indicate the number of sheets as indicated: 1/ 5. Moreover, you can number the views in consecutive, Arabic numerals, preferably in the order in which they appear on the drawing sheets. View numbers are preceded by figure FIG. For example, FIG. 1.
Margins
This is another important point. This has been a frequent reason for rejection among the patent offices. You must see it as one of the major errors in most of the USPTO rejections. According to it, you must keep the drawings in sheets within a certain marginal area, as defined by the guidelines. It should be 2.5 cm from the top, 2.5 cm towards the left, 1.5 cm from the right side, and 1 cm from the bottom. It is common in most jurisdictions.

These were some of the common and non-common points of guidelines that you must keep in mind when you file a patent drawing. However, there is a wide range of requirements based on the product, invention, or the patent office you are filing for, which is difficult to predict by the common person.
This is where an expert and an experienced professional knows the job, will not only help you prepare the quality drawings, or to get an objection free patent, but can also help you in saving time and money by creating drawings based on different guidelines, your requirements, and product, which are acceptable by different patent offices. Alternatively, he or she can make your job easy and accurate. They can help you file a patent for any particular office by letting you aware of all the consequences with the particular jurisdictions.
Related Article: Importance of a Best Patent Drawing Software
Importance of Shading in Design Patent Drawings
Design drawings play a crucial role as they require a lot of accuracy and quality. As a design consists of visual ornamental characteristics applied to an article of manufacture, it takes a good knowledge of design drawing ethics and rules. The sensor design is manifested in appearance. The subject matter of a Design Patent application may relate to the configuration or shape of an article, to the surface ornamentation, applied to an article, or the combination of configuration and surface ornamentation.
Further, one cannot separate a design for surface ornamentation from the article and cannot exist alone. You must apply a definite pattern of surface ornamentation to an article of manufacture. This surface ornamentation can include surface-shading. Moreover, you can also provide the drawing with appropriate surface shading which clearly shows the character and contour of all surfaces of any three-dimensional aspect of the design.
Also Read: How to Correct Patent Drawing Errors Under Rules 11a and 11h
Types of Shading
This is an important point to understand shadings and different patent drawings. You can divide different forms of shadings in the following types.
Straight-line surface shading: You can use straight lines with a different pattern of arrangement and heights to show the surfaces of different kind of products, mainly for flat and cylindrical surfaces. As shown, this fan is having multiple shading patterns with straight lines which indicates the flat surface of this fan.

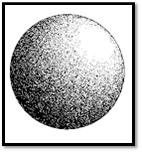
Stippling shading: You can use small dots are to illustrate the surface. Moreover, you can mainly use it to show the density and intensity of the surface of the product.
Cross-hatch shading: you can use these kinds of hatching to show the closed surface, as shown in the example, where, the crosshatch portrays the irregular surface of this mask.

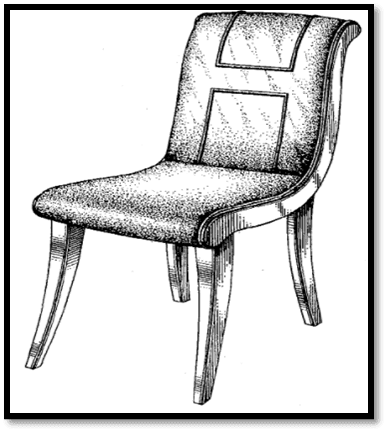
Combination of straight-line shading and stippling: both stippling and straight lines surface shading are permissible on the same object to show surface contrast. However, you must not use them together on the same surface. You must use them on different surfaces. Thus, as shown, you can use stippling to shade the leather part ans use flat shading for the flat wooden part. They are not on the same surfaces, they are on different surfaces. These are the types of shading that we can use in design patent drawings.
Also Read: Free Patent Drawing Software – All You Need to Know
Points to Remember
There are a few cases that we can keep into consideration while going ahead with the design drawing shadings.
- Open and solid areas of the design: It is also necessary to distinguish between any open and solid areas of the design. You must not use solid black surface shading except when you represent the color black as well as color contrast.
- Appropriate surface shading: shadings are very important in design patients, because lack of surface shading in the drawings filed may render the shape and contour of the design, non- enabling under PTO guidelines. Thus, you must consult the patent drawing expert before filing a design patent drawing.
- Avoid adding new matter: if the shape of the design is not evident from the disclosure, you can view the addition of surface shading, after filing as new matter, which is difficult to correct.
- The misconception with broken lines: sometimes people confuse broken or dashed lines with surface shading. Broken lines are helpful to show the context of a design without actually claiming the surrounding environment. You can use broken or dashed lines in such circumstances to indicate that the visible part forms no part of the claimed design.
Also Read: Professional Patent Drawings Can Help You Save Thousands of Dollars
Importance of a Professional Patent Drawing Expert
This is how you can create objection free and cost-effective patent drawings that will be globally acceptable. All these points of webinar give us an indication that partial knowledge about the rules and regulation is not all that one needs to get a patent approved without any objection. There is when a patent drawing professional or an expert Illustrator comes into the role. He or she has a wide range of knowledge and experience, that can ensure your patent to be approved in one go.
Hence, you must take help of a patent illustrator who can match all the standards and guidelines, as stated by different country offices where the use of his or her expertise, experience, knowledge of the latest software reduces the time, effort, high expenses of a rejection.
Gavin Roberts speaking: Thank you, Ankur for elaborating the coverage. Punit and you have covered a lot of grounds on this topic. This will help our readers to have a glimpse of the idea that how they can go further and can have the help of the patent illustrator for the best drawings they can have.
Questions & Answers
Can you please highlight some of the reasons for office action behind the blur quality of the drawings while they were not there before filing?
Punit Mehta speaking: Thanks for the question. This type of office action occurs when you directly file the patent without any professional advice. Usually, inventors add the photographs of the images directly in the PDF. After doing this, some type of office action occurs. This includes color drawings as the patent drawings should have been black and white. We cannot file the patent in color drawings.
The second one, maybe the blur quality. So because of that photograph in PDF, it decreases the resolution of the image to an extent where we receive a blue quality, and after reprinting the pages the quality becomes modular and it should not be visible.
The third one, Line thickness. The blurry image causes the image thickness and line thickness of the image to get to reduce and is not visible in the different types of thickness. An office action could also occur on the text size. After scaling the image to an extent so that it can be placed in a PDF, You must scale it to an extent when the size is at least 0.32 cm. Only some cases it can go up to 0.28 cm where there is overcrowding of the image and we have a lot bigger image.
Can we use dashed lines for showing a hidden part. If yes, is it the only application for it?
Ankur Sharma speaking: Thanks, Gavin. This question confuses a lot of people.
Yes, you can use dash lines for showing hidden parts. Not only this, you use it to determine the clean portion. It is most essential to differentiate the claimed portion from the rest of the parts. You cannot consider these parts as the claimed design. These are visible in dashed and broken lines. This helps to differentiate them from the claimed one and for proper and easy understanding. Further, it plays a significant role in design patent drawings, where we use dashed lines to distinguish the main invention from the unclaimed portion.
What kind of rejections one can receive while filing a design patent?
Punit Mehta speaking: It is indeed a good question. We usually get an office action enduring on the projections and inconsistency of drawings in design patents. As the inventor files, a patent without expert advice, this type of office action occurs. This is because, in design, even a small part should be placed consistently.
If you are replacing all the figures, similar parts must appear in all drawings and must end up with proper projections. An Illustrator knows how to create drawings that cover all the details by maintaining consistency by following all the rules and regulations provided by the PTO.
Is there a middle way between Black and white line, color, or with a grayscale image? Can I use all of them under one patent?
Ankur Sharma speaking: Line drawings are the best option for filing cost-effective patent drawings as we cannot use color drawings and the photographs in the utility or design patent application.
However, the USPTO will accept photographs in utility or design patent application or color drawings in utility patent applications, only if they are a practical medium for illustrating the claimed subject matter. The photographs and color drawings submitted in utility or design patent application must be of sufficient quality such that all the details in photographs and drawings are reproducible in black and white in the printed patent. Thus, we can choose any of them based on the application, but still, line drawings are the best to choose.
Each time I go for design patent drawings, they receive rejection. Please let me know the type of errors that are common and I might be making in design dockets.
Punit Mehta speaking: the most common errors in design docket is the kind of projections and shading. We can do this by maintaining the consistency of each figure with images and taking reference from 3-D files provided by the client to capture all the details.
Thus, after capturing the details and maintaining the consistency, and projection of the drawings, the next aim must be to build shading. The shading should also be consistent according to the part. It can also create an office action due to its inconsistency. Hence, instead of filing on your own and getting rejection can cause a lot of money wasted. The inventors should hire a professional for creating the rejection proof cost-effective patent drawings to reduce the cost.
How can I get rid of the blurriness of the drawing? Also, how can I enhance the quality of the grayscale image?
Ankur Sharma speaking: We need to understand the process for this. You can file grayscale or color images as drawings other than black and white line drawings in a utility patent application. Further, you can convert these to black and white images, electronically. Because of this, the quality of black and white images may get degraded.
Further, to obtain sufficient quality so that all details in the images are reproducible in black and white in the 18-month publication and the printed patent, images must be scanned at a minimum resolution of 300 DPI. You can also achieve this with the help of an illustrator who can enhance the quality of images by adjusting the accurate DPI through the knowledge of the tools like Photoshop and other tools.
Is it always compulsory to have at least one drawing in a utility patent application?
Generally, the drawings are based on the invention claims and description. Thus, it’s always necessary to make your invention understandable with the drawings. Thus, you must include at least 1 or 2 drawings to make your invention understandable.
This has been a wonderful session. I thank the speakers for their valuable time and for sharing their knowledge here.
Further, the PatSketch team is offering up to four drawings at no cost to all the attendees here. The offer is valid for a single request only for the participants of this webinar. The participants of this webinar can drop us an e-mail, at info@patsketch.com.

Lastly, I want to extend a big thanks to all the listeners, thank you very much, and have a great day ahead.
Other Related Articles
Patent Proofreading Process – A Complete Analysis