Patent drawings are an essential part of any patent application. They visually explain the invention and help examiners quickly understand its structure and functionality. However, one of the most common causes of rejection is improper use of hatch patterns.
This article covers why hatch patterns matter, the mistakes that often lead to patent drawing rejection, and the corrective steps you can take to avoid office actions.
Also Read: Customer Success Stories on Patent Drawings
What Are Hatch Patterns in Patent Drawings?
Hatch patterns consist of fine, evenly spaced, parallel lines, usually drawn at a 45° angle. Since most patent offices, including the USPTO, do not allow colored drawings, hatch patterns serve as the primary method to represent:
- Materials (e.g., metal, plastic, glass, wood).
- Cross-sectional views of objects.
- Surface shading to indicate depth and texture.
When applied properly, hatch patterns clarify the invention. When misused, they cause confusion and rejection under USPTO standards.
Related Article: Patent Drawings: How to Differentiate Between Industrial Designs and Patents
Drawing Errors That Can Result in Patent Rejection
Even though it is not mandatory to include drawings in a patent application, practitioners often choose to describe the invention to aid the examiner’s understanding visually. While patent drawings strengthen the application, any inconsistency or inaccuracy can result in the rejection of a patent drawing. Therefore, patents often face rejection due to the drawing errors mentioned below:
- Difference/inconsistencies between the submitted claims and the drawing
- Poor line quality and uneven lines
- Incorrect or a lack of hatching in a sectional view
- Design drawings with improper and poor shading
- Use of colored drawings and photographs
Also Read: How to Respond to an Office Action Received on Design Patent Drawings
Common Hatch-Related Errors (and How to Fix Them)
The USPTO enforces strict rules on hatching. Below are the most common mistakes seen in patent drawings and their solutions.
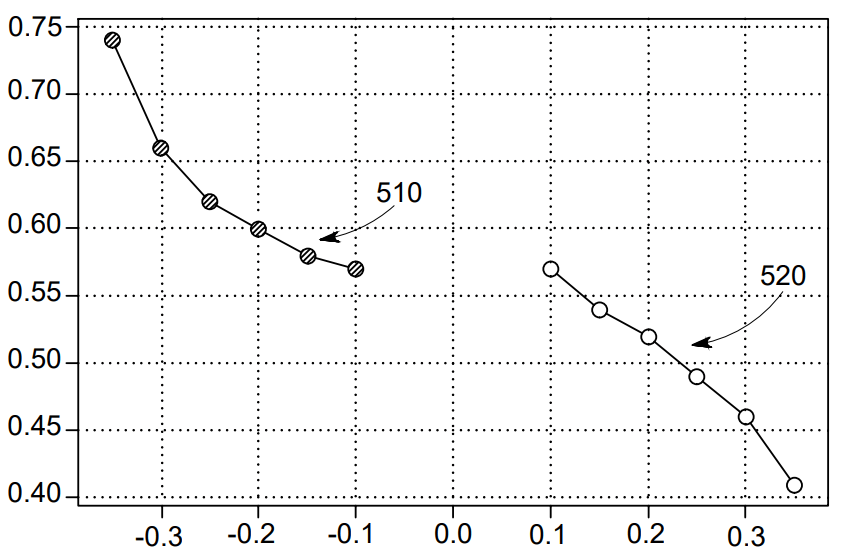
1. Graph Drawings with Background Clutter
- Mistake: Using background grids or failing to apply distinct hatch patterns in charts and graphs.
- Fix: Remove unnecessary backgrounds. Use unique hatch styles for each curve, bar, or dataset to clearly distinguish them.

Fig. 2 (a): Objections Based on Graph Drawings
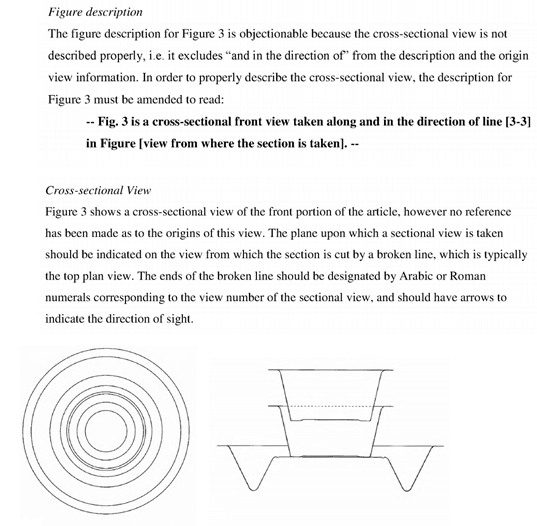
2. Cross-Sectional Views with Inconsistent Hatching
Cross-sections often rely on hatching to show internal parts. Errors occur when:
- Hatch lines obstruct numerals.
- Patterns overlap or lack uniform spacing.
- Orientation is inconsistent across different parts.
- Fix: Use evenly spaced 45° hatch lines. Leave white spaces for numerals. Apply different orientations or patterns to highlight different materials.

3. Reference Numerals Placed on Hatch Lines
- Mistake: Numbers or letters placed directly on hatching become hard to read.
- Fix: Place reference characters in blank spaces or use an underlined clear area to maintain legibility.
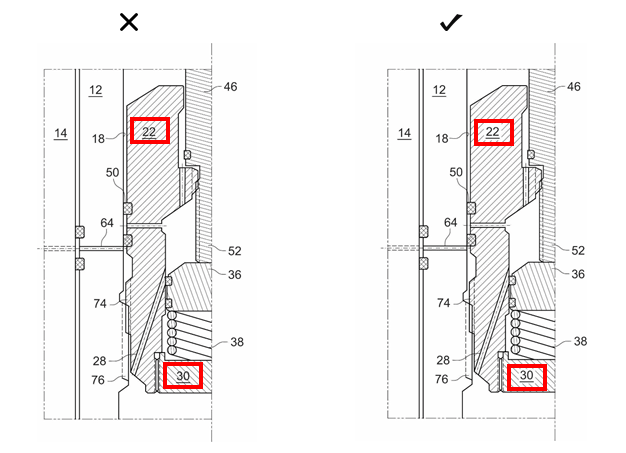
Fig. 5: Objections Based on Numbers, Letters, and Reference Characters
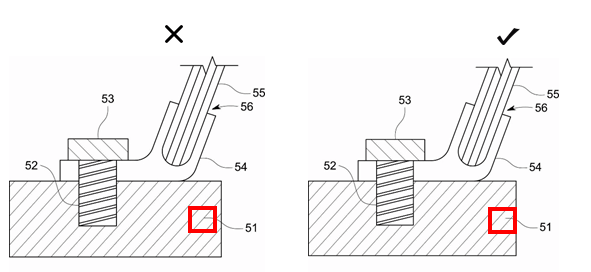
4. Leader Lines Touching Hatch Edges
- Mistake: Leader lines blend into hatch lines, making drawings confusing.
- Fix: Ensure leader lines are drawn between hatch lines, never touching or overlapping them.
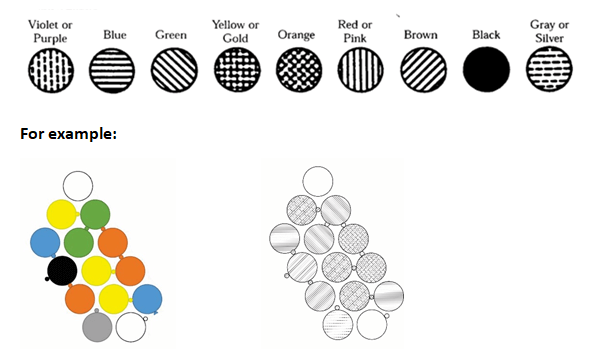
5. Material-Based Hatch Symbols Missing
- Mistake: Using the same generic hatch style across all materials.
- Fix: Apply standard hatch symbols (e.g., cross-hatching for metals, parallel shading for plastics) to represent different materials.
This helps examiners understand construction and ensures compliance with international patent drawing rules.
Also Read: Top 3 Design Patent Drawing Errors That Result in Office Actions
USPTO Standards for Hatch Patterns
To avoid rejections, hatch patterns must meet USPTO and WIPO requirements:
- Use thin, uniform, parallel lines angled at 45°.
- Hatching must not interfere with numerals or reference characters.
- Different parts or materials must be shown with distinct hatch styles.
- Shading must improve clarity, not obscure details.
Non-compliance typically results in an office action, requiring corrected replacement sheets.
Checklist to Avoid Hatch-Pattern Rejections
Before submission, review drawings against this checklist:
- Hatch lines are consistent and at 45°.
- Reference numerals remain clearly visible.
- Leader lines do not touch hatch edges.
- Each material type is represented with its correct symbol.
- Graphs are clutter-free, and data sets are clearly differentiated.
Why Professional Patent Drawing Services Are Essential
While applicants can attempt corrections themselves, even small errors add unnecessary costs and delays. Replacement sheets consume time and may risk application timelines.
At The Patent Drawings Company, our experienced illustrators specialize in:
- USPTO-compliant drawings for both utility and design patents.
- Correct application of hatch patterns for cross-sections.
- Error-free leader lines, numerals, and material symbols.
- Drawings compliant with multiple jurisdictions, including USPTO, EPO, and WIPO.
By outsourcing to experts, inventors and attorneys ensure their applications move smoothly without rejection risks.
Conclusion
Hatch patterns may look like minor details, but in patent drawings, they carry major significance. Improper use can result in patent drawing rejection, leading to costly office actions and wasted time.
By following USPTO standards or partnering with professional illustrators, you can prevent these issues and ensure your patent application remains strong. For accurate, compliant, and rejection-proof drawings, work with professionals who understand both legal requirements and technical precision.