Webinar Transcript
Rahul Rana Speaking: Welcome everyone to the Webinar. This is Rahul Rana, Senior Executive, Business Development. I am signing in from India to welcome you all to our webinar on the topic “The Secret to Avoid USPTO Rejections on Patent Drawings”. I will go on to introduce this topic and our esteemed speaker in our session today. I’m delighted to welcome all the participants from different countries around the globe.
Your participation is a wonderful encouragement to the efforts and attempts that we are making to raise awareness and spread knowledge. Sagacious owns this knowledge over several years of working with inventors, R&D organizations, IP departments, and IP law practices.
The speaker of the day is Ankur Sharma. He’s a Senior Patent Drafter with more than three years of experience in the patent industry and patent illustration. Welcome to the webinar, Ankur. Thus, before we start the presentation today, let me ask our speaker for his initial remarks on today’s topic.
Ankur Sharma Speaking: This webinar covers the essential points of the importance of patent drawings. Further, it discusses how we can make the drawings feasible for filing at USPTO. Additionally, it also discusses some important guidelines too. This webinar delivers an insight into how the guidelines come into play while responding to USPTO rejections on patent drawings. It covers office actions and how they act differently for different types of patent drawings.
Moreover, it emphasizes the requirement of a patent drawing expert to deal with these objections. It also reveals how a professional approach of an illustrator can help you to avoid the USPTO rejections on patent drawings. The discussion will mostly move around the role of drawings and their rules and regulations in USPTO.
Also Read: Free Patent Drawing Software – All You Need to Know
PatSketch – Offers
Rahul Rana Speaking: Thanks a lot Ankur for setting the context of this webinar. That is quite an explanation about the topic that we’re going to cover today.
In addition to that, we also have an announcement. PatSketch is offering up to four drawings at no cost to the attendees of this webinar today. The offer is valid for single or initial request only. The participants of this webinar can drop us an e-mail later at [email protected] and we will share it with them and you know, we’ll respond to them with that.

The next section deals with the main part of the webinar.
Agenda
The agenda of this webinar and the key points going to be covered under this topic are mentioned below.
- The requirement of patent drawings in USPTO: the importance of drawings and patent application for USPTO.
- Differences and guidelines for utility patent and design patents: the important guidelines of USPTO for drawings and their different points of considerations for utility and design drawings.
- Examiner rejections: utility vs design patents. Discussion of the USPTO rejections on patent drawings (for both design and utility patent). Further, it sheds light on how to respond to an office action and avoid rejection for utility and design patents. Moreover, we’ll learn how to identify these errors and respond to the USPTO rejections on patent drawings for design and utility patent with the help of some office actions and case studies.
- Importance of a patent expert: How it saves your time, effort, money, and helps in drawings approval by USPTO?
Also Read: EPO Drawing Rules and Guidelines
The Requirement of Patent Drawing in the USPTO
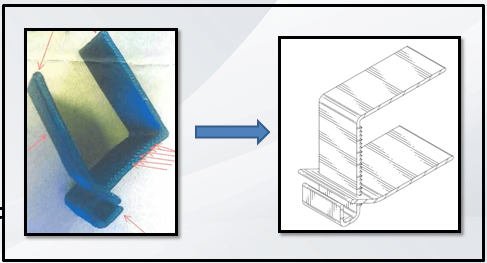
A picture speaks a thousand words. Moreover, drawings speak the universal language. One can often explain an invention more easily through drawings than in terms of description. Accurate and clear drawings strengthen and enhance patent applications. This helps the patent examiners, already overburdened with applications, to understand the invention faster.
For example, the blurred picture has been converted into line drawings to look more accurate and precise. Thus, we can make it clear with few more justified points on what essential role drawings have in USPTO filings.
Clarifying the Claims
Besides their ornamental parts, drawing helps in understanding the claims of a patent. Simple, clear, and precise images also help in instructing the judges in case of patent infringement. This often clarifies the patent owner’s claim and clenches the decision in his favor.
Amendments
Sometimes drawings can even make the applicant understand his or her invention. That is why drawings can also work to the advantage of patent holders. It helps in negotiating damages or a settlement and makes sure that the drawings are explaining and representing the patent.
Prevents infringement
This is indeed one of the most important benefits of drawings. A fine and accurately prepared drawing makes the patents understandable and unambiguous. This makes the potential infringers think about plagiarizing. Further, the earlier you detect the infringement, the better it is for patent owners. Hence, you must not underestimate the importance of drawings in their applications.
Further, the USPTO forms rules and regulations regarding patent drawings. Thus, it is best to work with a professional patent illustrator. He owns the knowledge, techniques, and skills to create high-quality patent designs. Additionally, he helps you convert your idea, invention, or vision into drawings with all precision. Furthermore, there are certain guidelines that one needs to follow to ensure a rejection-free patent filing. The next section deals with this information.
Also Read: Best Way to Create CAD File for Patent Idea
Differences in Guidelines of the USPTO for Utility and Design Patents
Different Patent Offices devise many universal rules you can follow. Moreover, the Patent Co-operation Treaty, PCT devises universal rules for international applications. It specifies how applicants in its 142 contracting states must create and submit patent drawings. Some requirements are universal to all the patent offices. However, there are some differences between the drawings for USPTO and PCT filings.
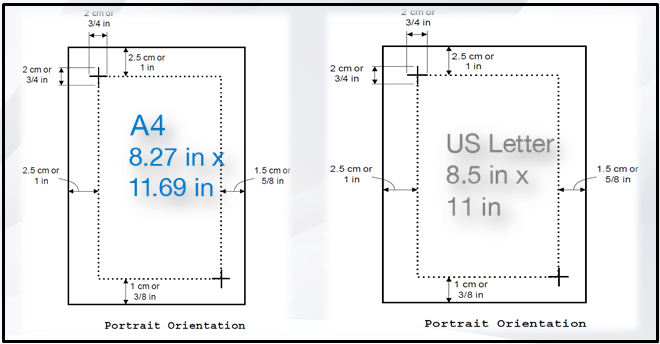
The main difference is the size of the paper on which you submit the drawings. The PCT only accepts the A4 size pages. Hence, it is the most acceptable page size around the globe. However, USPTO allows both the Letter size paper and A4 size. This is the important point one must keep into consideration while choosing USPTO for patent filing. Further, you can follow the guidelines mentioned below and receive the USPTO patent grant. These guidelines have some different and common points for utility and design drawings.
Also Read: Concept Sketch to Patent Drawing: How to Draw
USPTO Guidelines for Utility
Direct submission
This states that you must not file the drawings directly to the office. You must submit proper black and white line drawing as all the judiciaries including USPTO highly prefer this format. Further, you must keep the sheet free from any fouls or creases, and it is also a rule to use only one side of each sheet.
Using Color or Grayscale Images
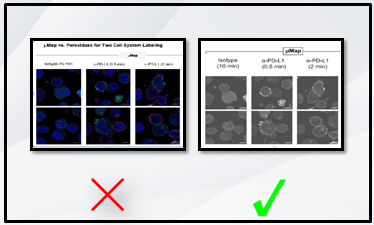
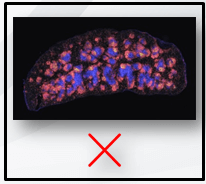
Not all patent office permits to use the photographs instead of black and white line drawings. However, there are some jurisdictions along with USPTO, like WIPO, where you can use photographs only on rare occasions. You can only use the photographs if it is the only practical medium to disclose the invention. For example, cell diagrams, plants, Vivo images, or micro-organisms.
You cannot achieve these via line drawings. However, the black and white line drawings are the most preferable and accepted by almost all PTO offices. You can see below a grayscale image that has been converted from a color image.
Margins
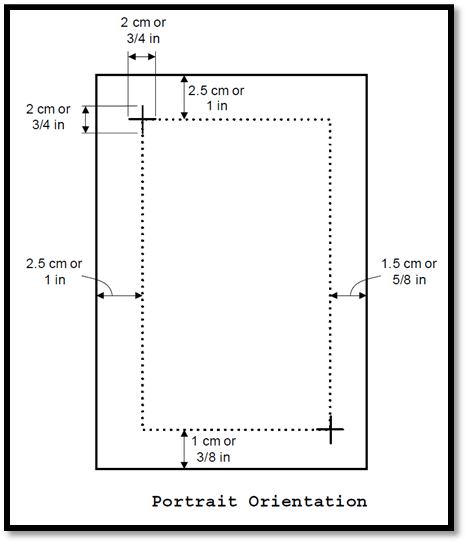
This is an important point and you must see it as one of the major errors in most of the USPTO rejections on patent drawings. You must keep the drawings in sheets in a certain marginal area as defined by the guidelines below.
- 2.5 cm from the top;
- 2.5 cm from the left side of the sheet;
- 1.5 cm from the right;
- 1 cm from the bottom of the sheet
Type of views
For making your utility patent drawings well-explaining and describing, you can prepare all the views including the following.
- Perspective view
- Isometric view
- Detailed view
- Partial view
- Sectional view
- Partial sectional view
- Exploded view
- Assembled view
Numbering of Drawings
After placing all the drawings, you must number the views in Arabic numerals in continuation from the number one. For example, FIG. 1, FIG. 2, FIG. 3, and so on.
Text size
The important aspect which leads to an office action is the size or the height of the font, which must not go below 0.32 cm. The USPTO does not permit any context less than 0.32 cm in size for utility drawings.
Numbering of sheets
You must number all the sheets contained in the USPTO application in consecutive Arabic numerals. You can place the numbers at the top or bottom of the sheet. However, you must not place the same in the margin.
Alterations
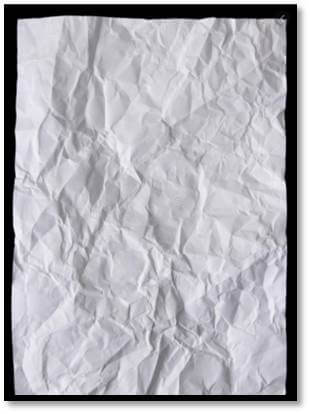
Sheets must not have any alterations. It must remain clean and neat and should not have any kind of stain or overlapping. Further, it must exclude any crossing lines, erasures, overwriting, or any leftover marks of photocopying. Non-compliance with this rule may be authorized if the genuineness of the content is not in question and the requirements for good reproduction are not at stake. Moreover, the USPTO does not allow any wrinkles as shown in the paper while filing.
Later document
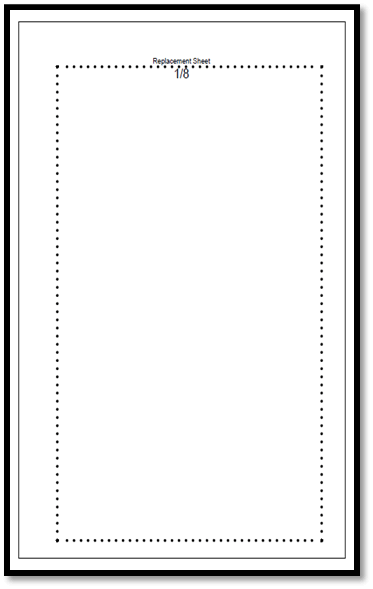
The response must include the corrected drawings with replacement sheets. These sheets must contain the defective figures replaced by the amended ones. Further, we must avoid adding any new matter to the patent otherwise it may cause another rejection.
Other special requirements for drawings
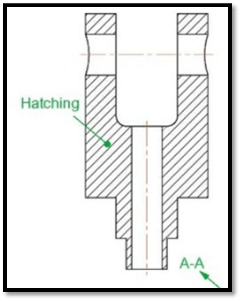
This involves all the other factors in a drawing that is responsible for the approval or rejection of a patent. Some of these are drawings with durable black, sufficiently dense and dark, uniformly thick, and well-defined lines. Further, the ones with strokes without colorings, cross-sections – indicated via oblique catching must remain clear. You must depict the numbers, letters, and reference lines neatly and as per the standards.
Hence, these were the guidelines that are important for utility applications. Most of them are common for design drawings. However, there are still a few differences in guidelines for design patent drawings.
Related Article: Professional Patent Drawings Can Help You Save Thousands of Dollars
USPTO Guidelines for Design Patent Drawing Applications
Differentiating the claims

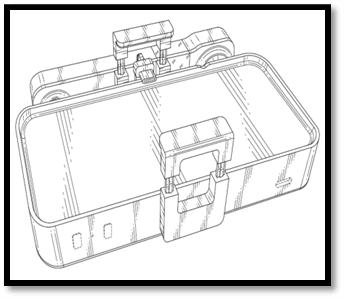
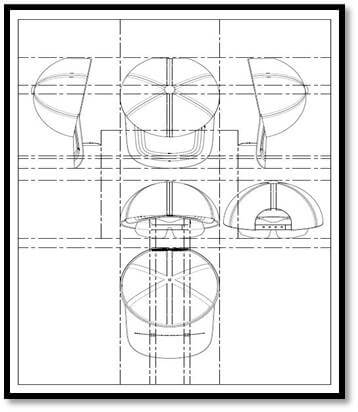
It is most important to differentiate the claimed portions from the rest of the parts. You must show the unclaimed parts designed in-dash or broken lines. This helps in differentiating them with the claimed parts for proper and easy understanding. As shown, we dashed out the little bucket in between those handles. While the rest of the part depicts the claimed portion, it depicts the unclaimed portion.
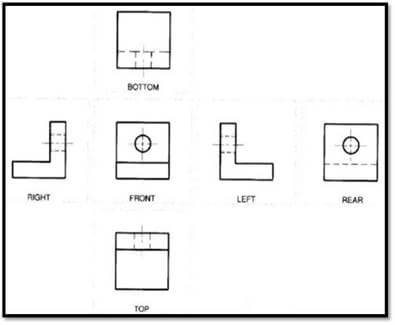
Types of views
This is also different from the utility patent drawing application guidelines. You can help the examiner understand the claims of the design in a better way. Further, you can add the following views to clearly show the appearance and shape of the design in three-dimensional.
- Standard design views
- Front
- Rear
- Left
- Top and bottom
- Perspective views
Scaling and Projections
Irrespective of the other countries, USPTO requires this criterion. Scaling and projections are some of the important points for design patent filing through USPTO. Unlike utility patents, applications for design patents rely solely on drawing. Here, scaling and projections of the views are extremely important to maintain the consistency of drawings and features. The projections shown below cover the following.
- Planer projections
- Right Projections
- Front Projections
- Rear Projections
- Left Projections
- Top, and
- Bottom Projections
Further, design patents require the projection of each part including the features of their corresponding parts.
Surface Shadings
Further, irrespective of a few other countries, USPTO requires adequate shading of all the drawing surfaces. Shading clearly shows the character and contour of all the surfaces for any three-dimensional aspect of the design. This requirement makes the USPTO design drawings appear more artistic than those of most other countries. The ones from other countries do not include any shading or broken lines.
Design drawings with surface shading and broken lines are acceptable under the USPTO. Hence, these were some of the different guidelines for utility and design drawings in the USPTO. Further, this helped us in gathering knowledge on how some of these are different from other judiciaries. The next section sheds some light on the USPTO rejections on patent drawings that one receives without consulting a professional. Moreover, it also deals with the way you can respond to these USPTO rejections on patent drawings for the approval.
Also Read: Utility Patent Drawings: How to Avoid Office Actions
Examiner USPTO Rejections on Patent Drawings: Utility vs Design Patents
Utility (Office Actions)
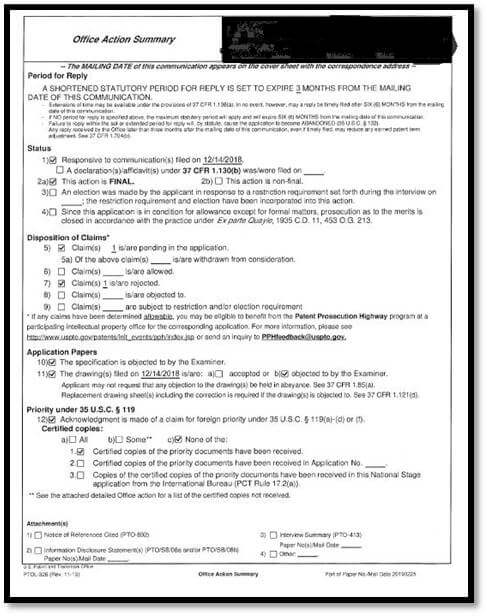
This section takes the help of a live office action form, which will make you understand how these rejection points look in an office action. Further, it will help in analysing the errors of a rejection to avoid USPTO objection over this particular office action.
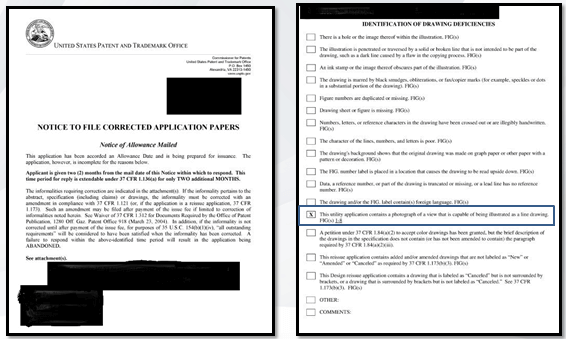
In an office action form, all the objection points have blank rectangles against them. The sheets shown here have blank rectangles against them. The points responsible for the USPTO rejections on patent drawings contain rectangle with crusts mark in it. There is an attached sheet that the highlighted objection point has a cross-marked box against it. This application faced USPTO rejections on patent drawings due to direct reproduction of photographs. This is even when they are capable of being illustrated through line drawings. Thus, approaching a professional expert can help you convert these pictures to black and white line drawings.
Let’s take a close look at the originally filed figures. Here, you can see the exact reason behind the rejection of an application. These original pictures are much blurry and don’t have any firm boundary or edges for the claimed invention. Hence, one must not include any directly reproduced pictures unless they cannot convert those into line drawings. This error has led to a number of office actions. Further, it is also one of the most popular rejection points in any USPTO office action form.
Related Article: The Importance of Patent Drawing Examples
How can you respond to USPTO Rejections on Patent Drawings?
This section deals with the steps one can follow to get rid of the office action rejections. Further, these steps also correspond to the actions we took in the past.
Line drawing
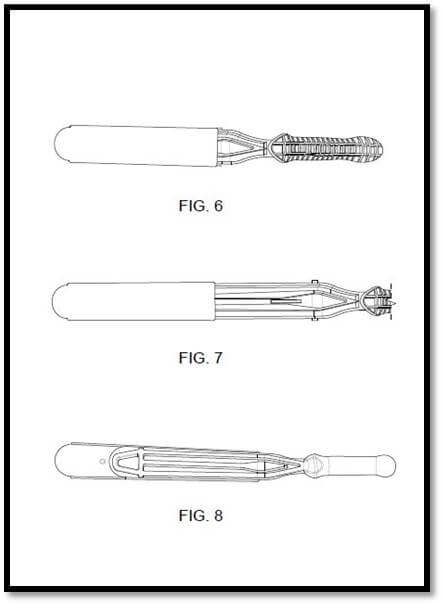
We formalized the line drawings considering the details and claims of the product based on the office action instructions. We prepared the required views with advanced AutoCAD tool. This helped each detail to receive proper exposure and clear understanding.
Material shading
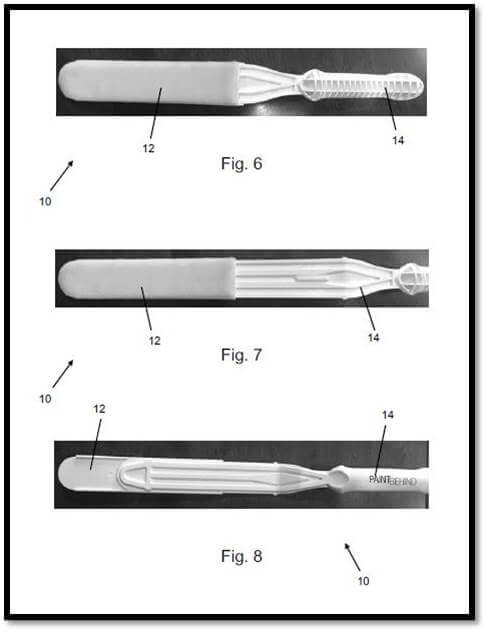
After converting the pictures into line drawings for the desired views, we went ahead with material shading. We added stippling to enhance the shape of the product and give the cover shown in FIG. 6 and FIG. 7. It displays the cover of the Sword to give the cover a closed look.
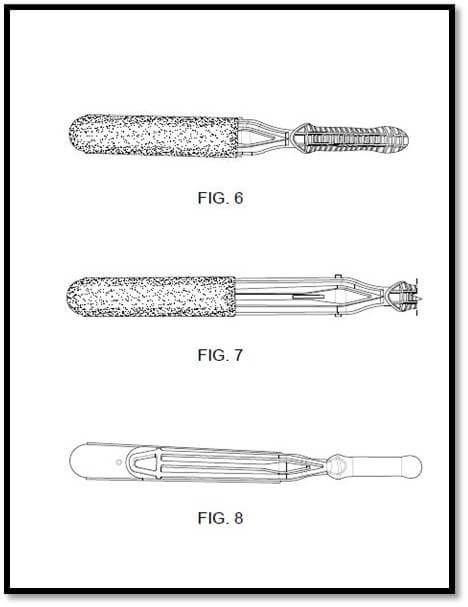
However, it is not always necessary to add shadings in utility patent drawings. Further, we can add some material or surface shading to make the patent presentable. This will help in clear understanding of the claims to avoid any USPTO rejections on patent drawings or infringements.
Other Guidelines
After completing the line drawings, views, and shading, added all the other required elements as per the USPTO guidelines. This includes the following features.
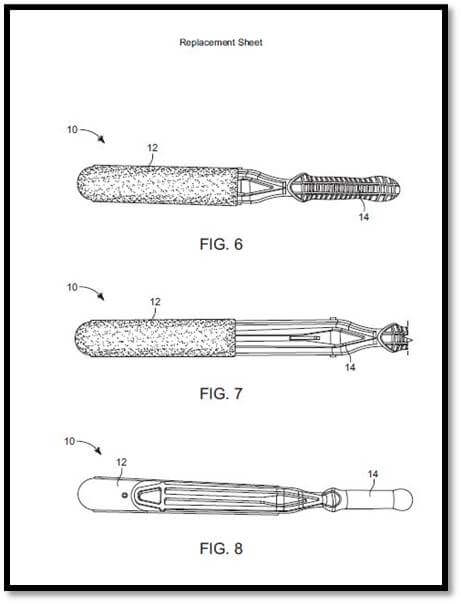
- Reference lines
- Reference numbers
- Replacements sheets in marginal area of the sheets
Further, after passing through the different levels of quality checks we delivered these drawings to the client. Hence, we didn’t receive any rejection further.
However, one must remain more accurate while dealing with design patent drawings. The better the drawings, the better is the patent and their chances of approval. Hence, the next section deals with an office action with the rejection in design drawings.
Related Article: Preparing Patent Drawings: Key Points to Remember
USPTO Rejections on Patent Drawings (Design)
We received this office action which was filed without consulting a patent drawing expert and without following the USPTO guidelines for design drawings. Hence, they ended up getting a rejection over the production of drawings. Further, the claim was unrecognizable as they didn’t have a proper picture to present the invention.
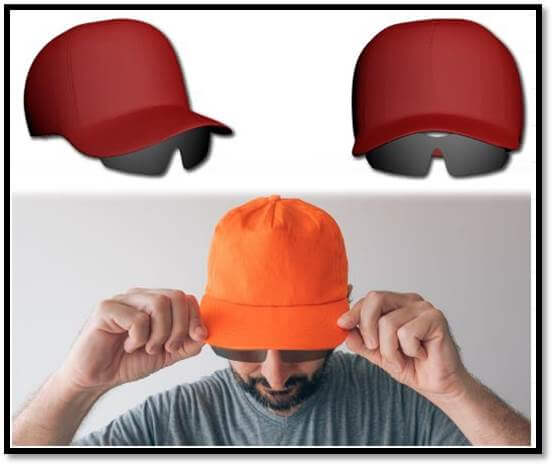
Let us take a look over the original file picture. Indeed, it was a difficult task to show how invention, that is, the glass frame was attached to the cap. It did not have any resource file or a 360 degree view of the actual product. It looked like an impossible task to get an approval from the USPTO. The client provided us the written information about the product and its invention. However, for formalizing the drawings, we had to work from scratch. We had to consider all the USPTO norms set for design drawings.
Let us see how our experienced illustrator got a grip over it. Further, we see how they used their expertise in this tough office action.
Key Steps Carried Out
3D Model
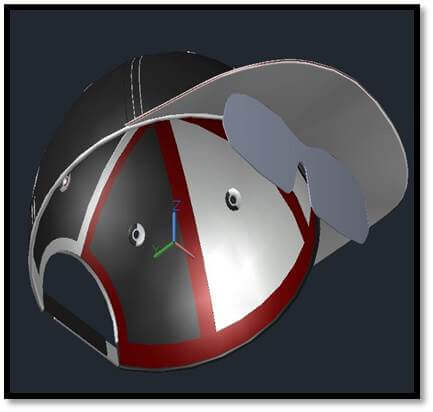
The illustrators started with the 3D model. After seeing the input, without the original product, you cannot execute the precision. Hence, the team decided to prepare its 3D model. The team executed this by giving the dimension and maintaining the ratio of the parts. For this, the experts use Solid works, that requires the assistance in these 3D tools.
Line Drawings
Next, they extracted all the standard views and converted them into line drawings through drafting techniques.
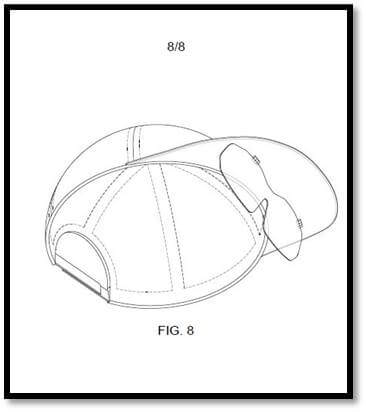
Projections and Views
An additional or an extra bottom perspective view (as shown) – FIG. 22 was also added. This was used to make the invention clear as per the office action instructions. Further, they wished that the views must remain consistent throughout the set. They were also required to keep all the parts and features equally protected, from their corresponding parts. These parts correspond to the ones visible under the projection and views section.
Surface Shading

Further, the team used appropriate surface shading to clearly show the character and the contour of all surfaces. These surfaces correspond to any three-dimensional aspect of the design. Moreover, this feature helps in showing the ornamental appearance of the shape of the design. The team further went through the levels of correction and prepared the drawings.
Then, they compared the amendments with the office action instructions and USPTO guidelines. The team submitted the replacement sheets to the client while ensuring that the design drawings do not face any objection. Thus, this is how these guidelines and rules cause USPTO rejections on patent drawings and the applicant goes for re-filing. This is usually caused when drawings are filed without consultancy or guidance of an expert.
Also Read: WIPO Patent Drawing Rules for PCT Applications
What does a Professional Patent Illustrator Do?
This section deals with some more facts about why it is most important to consult a professional while filing patent drawings to different judiciaries. Further, it discusses how this can make a difference and save your time, money and effort.
Ensures a Universal Approach
An illustrator possesses vast range of knowledge of various patent office guidelines. An illustrator always has the edge to create globally acceptable drawings for any particular judiciary based on the application. It is not possible for a common person to possess that range of study.
Moreover, it is very difficult to recognize which guideline belongs to which office. Even before filing a person is unable to understand the requirements of its own application. Thus, you can take help from an expert to make sure that the drawings are error-free and your application follows all the guidelines are followed.
Art of converting ideas or inventions into drawings
A drawing speaks more than words. Further, there are a number of people who are highly picture, or drawing oriented than words. An illustrator helps you represent the patent idea, or an invention in a 2D platform for better understanding. Not just for a common person, but patent law demands good patent illustrations. This makes patent drafting easy and wraps up the complete processing time.
Troubleshooting
Having knowledge of guidelines is not all we need to avoid rejection. There are many situations and requirements that demand the act of moment. Thus, it is essential to have a patent drawing expert for troubleshooting. This includes the following.
- How to maintain the pixels;
- Enhance the quality of drawings;
- Appropriate use of DPI for photographs;
- Understanding the claims, and lots more difficult situations, from wherein a patent illustrator brings out the quality.
Tools
The knowledge of different tools and software helps in developing precision in drawings and makes it less time taking. A patent drawing expert owns the command over the different tools which are used to prepare the drawings as per the application. For example,
- Photoshop: for enhancing the quality of pictures
- 2D software like AutoCAD for preparing line drawings, and
- other 3D software like Solidworks, Trio for preparing 3D models to get better view of surface and shape of an object. Further, it includes many more tools with which only a professional can deal.
Experience and Expertise
This is the most important point, as it is capable of making a change. A patent drawing expert works on a project along with all the knowledge of tools and guidelines. Further, he also develops the drawing precision. The years of experience of an illustrator plays a crucial role in handling the situation. They maintain responsible quality checks including the following.
- Maintaining margins
- Text size
- Sheet size
- Number of required views
- Line quality
- Rules, guidelines, and many other checkpoints that an experienced drawing expert keeps in consideration before filing a patent.
Thus, you must gather help from a patent illustrator who can match all the standards and guidelines. This must remain in compliance with the different country office rules. Further, it must contain the use of his or her expertise, experience and knowledge in the latest software. Therefore, this helps in reducing the time, effort and high expenses of a rejection.
Also Read: All You Need to Know About Latest US Patent Drawing Rules
Questions & Answers
Rahul Rana Speaking: Thanks a lot for this elaborate coverage. I believe that our listeners would have got a good view and understanding about the causes of the USPTO rejections on patent drawings. Further, the listeners and readers would have got to know how to make sure that they don’t face such situations. The audience has a lot of questions.
Which one is better out of black and white line drawings, colour, or grayscale images?
Ankur Sharma Speaking: Line drawings are indeed the best option for filing patent drawings. Coloured drawings and photographs are not ordinarily permitted in a utility or design patent applications. However, the USPTO will accept the photographs in utility or design patent applications or colored drawings in utility patent applications.
This also happens only when they are the only practical medium for illustrating the claimed subject matter. The photographs and the color drawings you submit in utility or design patent applications must show sufficient quality. This is such that all the details in photographs and drawings are reproducible in black and white in printed patent. Thus, we can choose any of them based on the application. However, line drawings are the best among to choose.
Rahul Rana Speaking: Thanks a lot for the answer to the question.
What are the font styles we can use? Can I use text size with more than the given size?
Ankur Sharma Speaking: The guidelines for these characters are universal. The context must remain uniform in the style and size. Further, it must remain oriented in the same direction as the view. It should not cross, overlap, and intersect with any object to maintain the sanity. Moreover, the important aspect which leads to an office action is the size, or the height of the font.
This must remain at least 0.32 cm, and any contexts less than 0.32 cm in size is not permitted. You can use the text height above the standard in certain cases of utility patent application only. However, we must not decrease the size of the text below 0.32 cm.
Should I be worried about blurring of the submitted pictures? How can I enhance the quality of grayscale images?
Ankur Sharma Speaking: This is indeed a good question. We must understand the process for this. You have to electronically convert the grayscale, or colour images to black and white images before filing a utility patent application. Further, this may lead to degradation of the quality of the black and white images.
Thus, you must obtain the sufficient quality so that all the details in the images are reproducible in black and white in the 18 month publication. Further, you must scan the images in the printed patent at a minimum resolution of 300 DPI. You can achieve this with the help of an illustrator. He will enhance the quality of images and will adjusting the accurate DPI through his knowledge of tools.
Rahul Rana Speaking: Further, you must not just basically convert them into grayscale images. You must make sure that it actually marks up to the quality required in the patent.
Is shading compulsory in all drawings and is it applicable to all patent offices?
Ankur Sharma Speaking: this is one of the most asked questions. Although there are no such rules regarding shading about whether it is compulsory or not in all types of drawings. However, it plays the role of a catalyst in design drawings and helps in receiving approvals from the office. A design patent depends on the accuracy of drawings.
Thus, surface shading will only help the examiner to understand the shape and design of the product matter. Moreover, it is the USPTO that allows all shading. However, there are a few countries that only require the line drawings without shading. We only require line drawings and claimed portions in China Patent Office.
I have five drawings for an application. Can I file all of them in one sheet?
Ankur Sharma Speaking: There are no such guidelines regarding how many figures you must include in a sheet. You can use it according to the drawing. Whether they are complex, detailed, or simple and small, you must keep maximum two figures in one sheet. Increasing the number of figures will lead to poor quality while printing them for filing.
Also, it is essential that the ratio of the drawings with a sheet is proper and falls in standard margin area. You must create a drawing with a scale that shows the mechanism of the invention without crowding or overloading. Otherwise, it gets close to the margins which on printing can create an illusion. It may appear that the figures are moving out of the marginal boundaries. Thus, you may end up getting a rejection from the patent office. It is another reason to not use many figures ending up in a single sheet.
Rahul Rana Speaking: Thus, you may want to avoid an office action to make sure that the quality is maintained. You may wish for the patent office to understand your figures. Thus, you must make sure to not put more than two figures on a single page.
What is the best software to do hand-drawings? Can I file own drawings with the knowledge?
Ankur Sharma Speaking: It is really important to use these tools and software to ensure the smooth and swift accuracy in patent drawings. There are many applications that we can use to make the drawings look real. However, we can use AutoCAD for ease of the user. There are other software like at Adobe, Illustrator, Corel Draw. Further, you can use other 3D software like Solidworks Trio that to see the invention from 360 degree.
Moreover, knowing the guidelines or learning the drawing tools is not sufficient to prevent your application from rejection. A professional illustrator has the experience and expertise to deal with doubts and queries. They can solve and help you gain awareness on the difficult errors and issues in the drawings. They can use their troubleshooting skills, years of experience and knowledge, versatility and grid over all the latest technology in the patent field.
Related Article: The Top 6 Most Unusual Drawings for Patents
Final Remarks by the Speaker
Rahul Rana Speaking: Thanks Ankur. That takes care of the query from the gentlemen. This provides us the knowledge on the software that we can use while owning specific knowledge about the guidelines. Further, it is the best way to make sure that your clients face no USPTO rejections on patent drawings and go smoothly with their application getting higher acceptance with the drafting expertise.
This has been a wonderful session. I’m sure our listeners have great takeaways from this session. They may use several of these pointers when working on their patent drawings, their patent applications, and businesses. Thanks a lot to our speaker for taking time to explain these points about USPTO guidelines. Thank you for further eliciting on the USPTO rejections on patent drawings people face with their drawings and how to counter them and how to make sure that their patent application process goes smoothly. That takes care of it all pretty well.
Moreover, the PatSketch team is offering up to four drawings at no cost to the attendees of the webinar. The offer is valid for a single, our initial request only. One project that has four figures or more gets you those 4 figures at no cost.
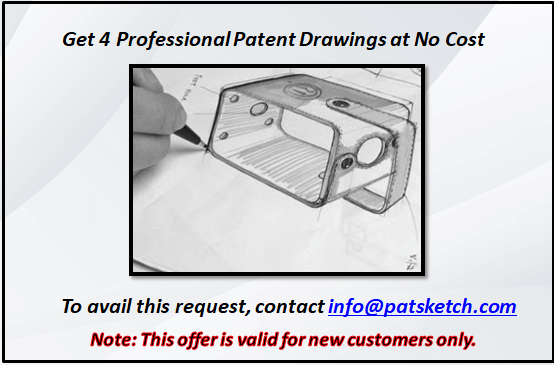
You can make use of this offer, as it’s exclusive for the readers and participants of this webinar. To avail this service, you can drop us an email at [email protected]. There are going to be a number webinars ahead as well. See you there as well. Please join us on our next webinar.
Other Related Articles
What are the Top Qualities of a Patent Illustrator?